Docker - Zero to Hero (with SpringBoot + PostgreSQL)
Nowadays,we hear the word docker everywhere in the software development industry. I first heard about docker at the tech event TensorFlow Dev Summit Colombo in 2018. I still hear it almost every tech event I go. Therefore I thought to share some facts about docker here.
We are going to talk about ?
-
What is Docker, Docker image, Docker container?
-
Setting up PostgreSQL Database.
-
Building docker image for a simple spring boot application.
-
Deployment with docker containers.
-
Shipping your containers to any other machine.
-
Some issues and troubleshooting.
-
What next? docker swarm or k8s
In this discussion, I try to keep everything short and sweet so everyone can grab everything quickly.
Step 1:
Docker
It is a tool which has made containerization easy. Therefore, software developers can easily create, deploy, and run applications by using containers. It allows developers to package up an application with all of the parts it needs, such as libraries and other dependencies, and ship it all out as one package to the production saving lots of time for dev rather than struggling with small scale deployment specially for testing. With docker, we can ship our program to another guest machine easily as a docker image is built with all the dependencies,libraries it needs.
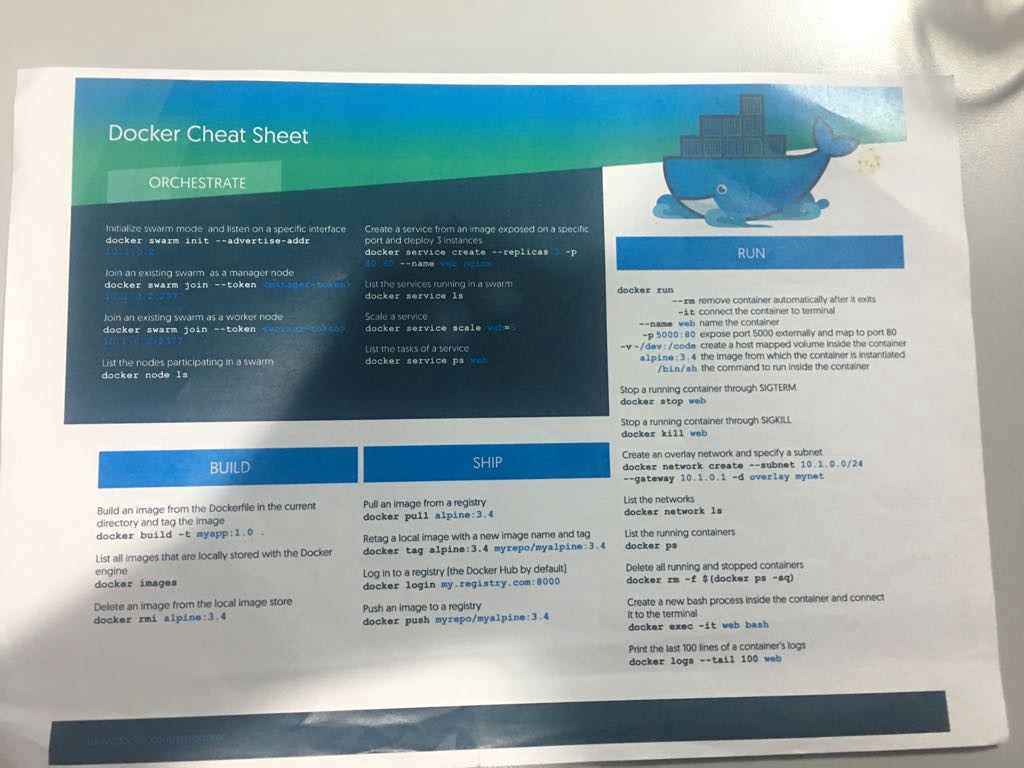
Just have a look on its architecture.

Docker images and Containers
Docker image is an executable package that includes everything needed to run an application — the code, a runtime, libraries, environment variables, and configuration files — everything you need to run the application. By using that image we can create a container(or many containers to distribute traffic) which really host our applications. We can find some pre-built docker images at Docker Hub as well as we can add our own images to docker hub and use it anywhere on the earth by pulling back from the cloud.
Step 2:
First we need to install docker for windows (or linux) Download Docker Here.
Hint:Enable Hyper-V feature on windows and restart.
Then open powershell with Administrator privilege and check ,
docker info
To see running containers, run
docker container list -a
or
docker ps
To check all the images you have, run
docker image list -a
Now we need to set up postgres database. We can get it from the Docker Hub. But we need to create a volume for store data.
docker create -v /var/lib/postgresql/data --name PostgresData alpine
then, we create the database.
docker run -p 5432:5432 --name postgres -e POSTGRES_PASSWORD=admin -d --volumes-from PostgresData postgres
First it checks local repository for images, if not found it pulls from the docker hub. Now again you can check docker containers and images with above commands. Check the changes. Then open pgAdmin3 for creating tables inside the database.Add new server and create new database with the name ‘testdb’ and run following SQL query.
DROP TABLE IF EXISTS books CASCADE;
CREATE TABLE books (
  id         SERIAL,
  title       TEXT,
  author      TEXT,

  PRIMARY KEY (id)
);

INSERT INTO public.books (
  id, title, author)
VALUES (1, 'Madol Duwa', 'Martin Wickramasinghe'),
  (2, 'Gamperaliya', 'Martin Wickramasinghe');

CREATE SEQUENCE hibernate_sequence START 1;
SELECT setval('hibernate_sequence', (SELECT max(id) FROM public.books));
okay, now you have a complete database up and running.
To stop container ,run
docker container stop [container name1] [container name2] [...]
To start container,run
docker container start [container name1] [container name2] [...]
To remove containers,run
docker container rm [container name1] [container name2] [...]
or to remove all containers ,run
docker container rm -f $(docker ps -aq)
To remove images, run
docker rmi -f [container name1] [container name2] [...]
or to remove all images, run
docker rmi -f $(docker images -a -q)
Nice work, now we are done with the database. Next we are going to create the springboot app.
Step 3:
Lets build a springboot app to get some data from the postgres db.
Task: we have some book data — id,title,auther — in the db and we send GET request to retrieve data from db.
BookEntity.java
package com.example.demo;

import lombok.Getter;
import lombok.Setter;

import javax.persistence.Entity;
import javax.persistence.Id;
import javax.persistence.Table;

@Entity
@Table(name = "books")
@Getter
@Setter
public class BookEntity {

    @Id
    private Long id;

    private String title;
    private String author;

}
BookRepositoty.java
package com.example.demo;

import org.springframework.data.jpa.repository.JpaRepository;

public interface BookRepository  extends JpaRepository<BookEntity,String> {

    BookEntity findById(Long id);

}
RestController.java
package com.example.demo;

import org.springframework.beans.factory.annotation.Autowired;
import org.springframework.http.MediaType;
import org.springframework.http.ResponseEntity;
import org.springframework.stereotype.Controller;
import org.springframework.web.bind.annotation.RequestMapping;
import org.springframework.web.bind.annotation.RequestParam;
import org.springframework.web.bind.annotation.ResponseBody;

@Controller
@RequestMapping(path = "/book")
@ResponseBody
public class RestController {
    private final RestService restService;

    @Autowired
    public RestController(RestService restService) {
        this.restService = restService;
    }
    @RequestMapping(value = "data", produces = MediaType.APPLICATION_JSON_VALUE)
    public ResponseEntity onResRequest(@RequestParam(value = "id") String id){
        Long Id = Long.parseLong(id);
        return ResponseEntity.ok(restService.getBookStats(Id));
    }
}
RestService.java
package com.example.demo;

import com.fasterxml.jackson.databind.ObjectMapper;
import org.springframework.beans.factory.annotation.Autowired;
import org.springframework.stereotype.Service;

import javax.transaction.Transactional;
import java.time.LocalDate;
import java.util.ArrayList;
import java.util.HashMap;
import java.util.List;
import java.util.Map;

@Service
@Transactional
public class RestService {
    private BookRepository bookRepository;

    @Autowired
    public RestService(BookRepository bookRepository) {
        this.bookRepository = bookRepository;
    }

    public String getBookStats(Long id){
        BookEntity book= bookRepository.findById(id);
        String result="{ID : "+book.getId().toString()+",Title : "+book.getTitle()+",Author :"+ book.getAuthor()+" }";

        return result;
    }
}
application.properties
spring.datasource.url=jdbc:postgresql://localhost:5432/testdb
spring.datasource.driver-class-name=org.postgresql.Driver
spring.datasource.username= postgres
spring.datasource.password=admin
spring.jpa.properties.hibernate.dialect = org.hibernate.dialect.PostgreSQLDialect
spring.jpa.hibernate.ddl-auto=none
DemoApplication.java
package com.example.demo;

import org.springframework.boot.SpringApplication;
import org.springframework.boot.autoconfigure.SpringBootApplication;

@SpringBootApplication
public class DemoApplication {

    public static void main(String[] args) {
        SpringApplication.run(DemoApplication.class, args);
    }
}
Now build the app and create the .jar and check whether it is correctly placed inside ./target/*.jar
Lets build the docker image and run the container for our app.
For building the image, we need Dockerfile (this file gives the instructions how to build the docker image).
FROM openjdk:8-jdk-alpine
VOLUME /tmp
EXPOSE 8082
RUN mkdir -p /app/
RUN mkdir -p /app/logs/
ADD target/demo-0.0.1-SNAPSHOT.jar /app/app.jar
ENTRYPOINT ["java","-Djava.security.egd=file:/dev/./urandom","-Dspring.profiles.active=container", "-jar", "/app/app.jar"]
Note: alpine version is for reducing the image size.
Now goto powershell cd into project folder nd run,
docker build ./ -t springbootapp
-t for tagging the image with given name.
Now again check your images.
Step 4:
Now we need to deploy containers combining all together. For that, we use docker-compose.yml file.
Inside the project directory create .yml file and save following lines.
version: "3"
services:
  postgres:
    image: postgres:latest
    network_mode: bridge
    container_name: postgres
    volumes:
      - postgres-data:/var/lib/postgresql/data
    expose:
    - 5432
    ports:
      - 5432:5432
    environment:
         - POSTGRES_PASSWORD=admin
         - POSTGRES_USER=postgres
         - POSTGRES_DB=testdb
    restart: unless-stopped
# APP*****************************************
  springbootapp:
    image: springbootapp:latest
    network_mode: bridge
    container_name: springbootapp
    expose:
      - 8080
    ports:
      - 8080:8080
    restart: unless-stopped
    depends_on:
      - postgres
    links:
      - postgres
volumes:
  postgres-data:
Now run ,
docker-compose up
You can build image using Dockerfile before run containers,
docker-compose up -build
Now everything has done.
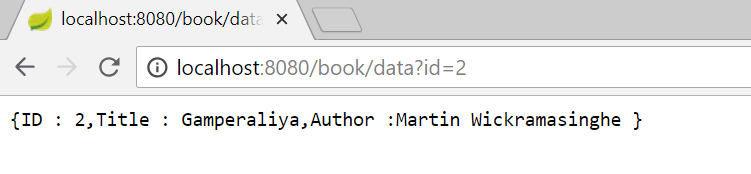
change id number and check the results!!!!
You can run it anywhere with those images now.
Step 5:
Lets see how we can ship these images to another machine. First we need to save image to .tar file then load it back to docker engine on another machine. Saving file.
docker save -o ./springbootapp.tar springbootapp
docker save -o ./postgres.tar postgres
now move these .tar and load
docker load -i ./springbootapp.tar
docker load -i ./postgres.tar
with .yml file run the containers again.
To copy the files inside the docker container to the local machine,
docker cp springbootapp:./ ./
Step 6:
Troubleshooting
-
Docker doesn’t run if the Hyper-V feature is not ticked on windows
-
If required ports are not released, run
netstat -anoand find process id (PID) and kill it on Administrator powershelltaskkill /PID xxxx /F -
Alpine has some missing features. Therefore sometimes we can test our app on machine but on docker it crashes. You can change to
openjdk:8-jre(image size may large) -
If everything is okay but docker is not working properly , RESTART :)
Step 7:
Now we have docker containers and images for our app. But we do not have any structure to manage them with the growing traffic(load). Therefore, we need a container orchestration mechanism. Here the docker swarm and kubenetes come to the picture.
I hope now you have a somewhat clear picture about docker.
Hope you enjoyed the content.
Happy Coding!!!